


[ad_1]

Key Takeaways
- The incline bench press trains your chest, shoulders, and triceps, and it’s among the best workouts for creating your higher chest particularly.
- Correct incline bench press type includes pinching your shoulder blades again and down, reducing the barbell to your higher chest, and pushing the bar again as much as the beginning place.
- Hold studying to be taught extra about correct incline bench press type, the way to program the incline bench press into your exercises, and extra!
Simply need a fast rundown of the way to incline bench press with correct type? Right here’s the TL;DR:
- Lie on an adjustable bench angled at 30- to 45-degrees.
- Pinch your shoulder blades collectively, pull your shoulders down, and plant your ft firmly on the bottom.
- Seize the bar so your palms are barely wider than shoulder-width aside. The bar must be resting in your palms somewhat than in your fingers.
- Unrack the bar and maintain it over your higher chest.
- Decrease the bar down in a straight line and contact it slightly below your collarbone. Whereas reducing the bar, squeeze it arduous, preserve your butt involved with the bench, and press your ft into the ground.
- Press the load again as much as the beginning place.
- You’re now prepared for the subsequent rep (or to re-rack the bar if it’s the top of your set).
And right here’s a video of what this appears to be like like:
Now, in order for you the total eggs to apples clarification of the way to incline bench press with excellent type, the six greatest incline bench press variations, and a free incline bench press exercise, preserve studying!
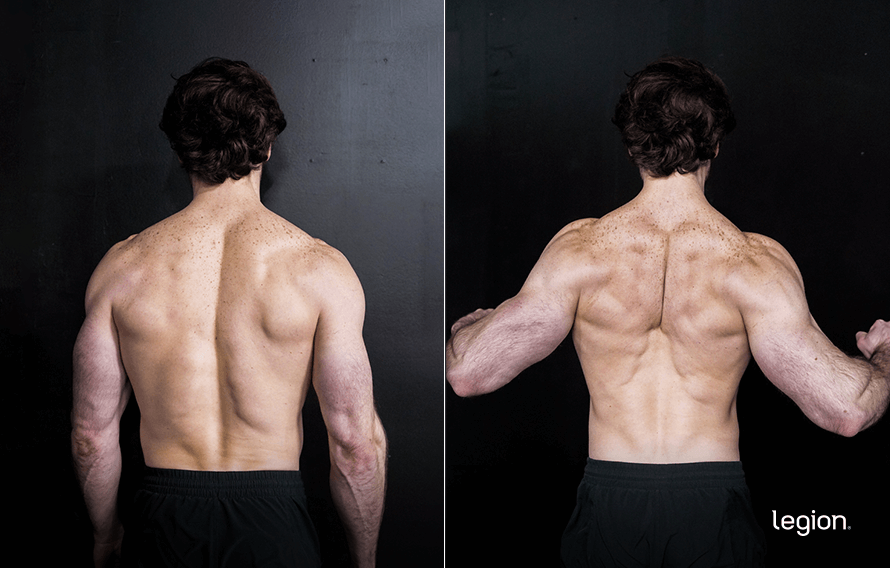
And for those who discovered this text since you’re sad along with your chest, I perceive.
I was in the identical boat. Right here’s how I sorted my first 12 months or so of weightlifting:

Not too spectacular.
I stored at it, although, and right here’s the place my chest was six years later:

Higher, however nothing to jot down residence about, both, particularly contemplating how lengthy it had taken me to get there.
Quickly after I took that image, I acquired critical about studying the actual science of power coaching —together with the rules you’ll be taught on this article—and right here’s the place a few years of high-quality coaching (and weight-reduction plan!) acquired me:
And whereas I don’t keep this shredded 12 months spherical, my chest nonetheless appears to be like huge and outlined even once I’m fatter:
And that’s with no pump, frando.
One of many largest adjustments I made to my coaching was together with extra workouts for my higher chest, particularly the incline bench press.
So, if you wish to take your pecs from pitiable to praiseworthy, you wish to get good on the incline bench press. And that’s what you’re going to learn to do on this article.
Particularly, you’ll be taught:
- What the incline bench press is
- What muscle tissue it trains (it’s not simply your chest!)
- Why the incline bench press is so efficient at constructing muscle
- Find out how to incline bench press with image excellent type
- The six greatest incline bench press variations
And to prime all of it off, I’m going to offer you 4 incline bench press exercises which you could put to make use of immediately.
What Is the Incline Bench Press?
The incline bench press (or incline barbell bench press) is a compound chest train that’s similar to the flat barbell bench press. The principle distinction is it’s carried out utilizing an incline bench (therefore the title) as an alternative of a flat bench.
By altering the angle of the bench, you additionally change which muscle teams the train emphasizes. As a normal rule, vertical pushing workouts just like the navy press primarily prepare your shoulders and arms, whereas horizontal pushing workouts just like the flat bench press primarily prepare the chest and arms.
Thus, the incline bench press is someplace in between.
For that reason, it’s typically included in bodybuilding and power coaching routines as a compound train on push (as a part of a push pull legs cut up), chest, or higher physique days, and in powerlifting routines as an adjunct train to spice up bench press power.
Learn: Find out how to Discover the Greatest Exercise Cut up for You
It’s very efficient for creating your higher physique muscle tissue and getting robust on the incline bench press can enhance your flat barbell bench urgent, too. What’s extra, it’s additionally an excellent train for rising your shoulders, a notoriously cussed muscle group.
Abstract: The incline bench press includes urgent a weighted barbell over your chest whereas mendacity on an incline bench.
What Muscle mass Does the Incline Bench Press Prepare?
Most individuals consider the incline bench press as solely a chest train, nevertheless it’s far more than that.
It additionally helps develop your triceps, shoulders, and even your biceps to a sure diploma.
Particularly, the incline bench press develops the . . .
- Pectoralis main and minor
- Triceps brachii (lengthy, lateral, and medial heads)
- Entrance (anterior) and center (lateral) deltoids
- Biceps brachii
It additionally helps prepare the lats, traps, and forearms to some extent, however these muscle tissue play second fiddle to the pecs, triceps, and shoulders.
The principle muscle of the chest is the pectoralis main, or “pec main.”
Right here’s what it appears to be like like:
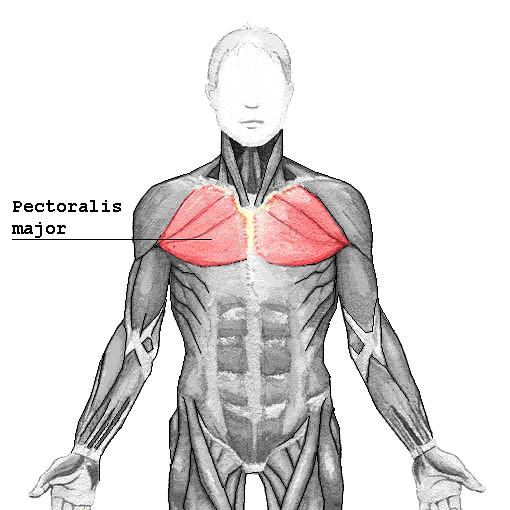
The chest muscle’s important perform is to convey the higher arm throughout the physique (in the direction of the sternum).
As you may see within the picture above, the pectoralis main has a number of “heads,” or locations the place the tendons connect to the skeleton.
There’s a sternocostal head, which attaches the breastbone and rib cage to your higher arm, and a clavicular head, which attaches your collarbone to your higher arm.
Why is that this necessary?
How a muscle attaches to the skeleton influences the way it responds to coaching.
For example, sure workouts, just like the flat and decline bench press, emphasize the bigger sternocostal head of the pecs, whereas others, just like the incline and reverse-grip bench press, emphasize the smaller clavicular head.
Discover that I stated emphasize, not isolate, as a result of all urgent workouts contain each heads of the pecs to some extent or one other.
Analysis reveals that the incline bench press is a unbelievable train for emphasizing the “higher chest,” and subsequently, must be a staple in your chest coaching (extra on this in a second).
This helps you stop muscle imbalances, make sure that your higher chest doesn’t fall behind in growth, and make sure you wind up with a proportionate pair of pecs.
Abstract: The incline bench press trains your chest, triceps, and shoulders, however what units it aside from different workouts is its potential to coach the clavicular head of your pecs—additionally known as your “higher chest.”
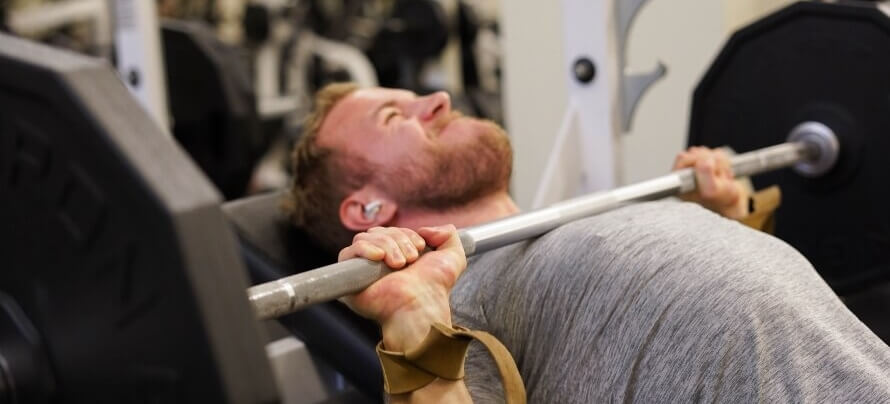
Find out how to Incline Bench Press with Correct Type
There are three steps to correct incline bench press type:
- The setup, the place you place your physique and unrack the bar.
- The descent, the place you decrease the barbell to your higher chest in a managed method.
- The ascent, the place you press the load off your chest and again to the beginning place, setting your self up for the subsequent rep.
Each facet of incline bench press approach—whether or not it’s unracking the bar, reducing the load, urgent the bar up, or anything—might be filed beneath one in every of these three classes.
Let’s undergo every of them intimately, beginning with the setup.
Step 1: The Setup
Correct incline bench press setup comes all the way down to getting just a few issues proper:
- Place your physique
- Grip the bar
- Place your ft
- Arch your again
- Unrack the bar
Let’s take a better have a look at every of those steps.
1. Place your physique
First, angle a bench to 30 to 45 levels.
Right here’s what totally different angles seem like:
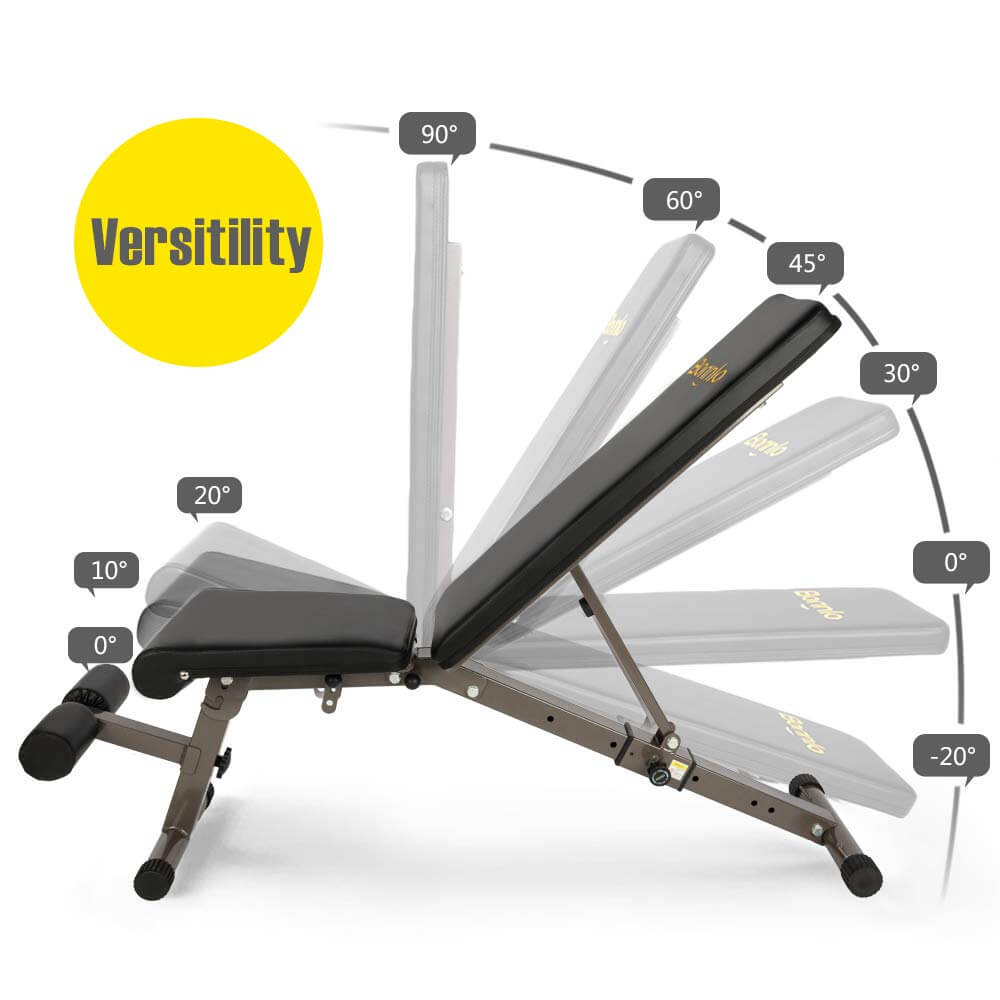
I choose a 45-degree angle, however some folks choose barely roughly than this. Mess around with totally different angles inside this vary and see what you want most. Simply ensure that when you choose an angle you want, persist with that for a number of months earlier than altering it once more.
Subsequent, alter the seat peak so your eyes are beneath the bar whenever you lie down, like this:
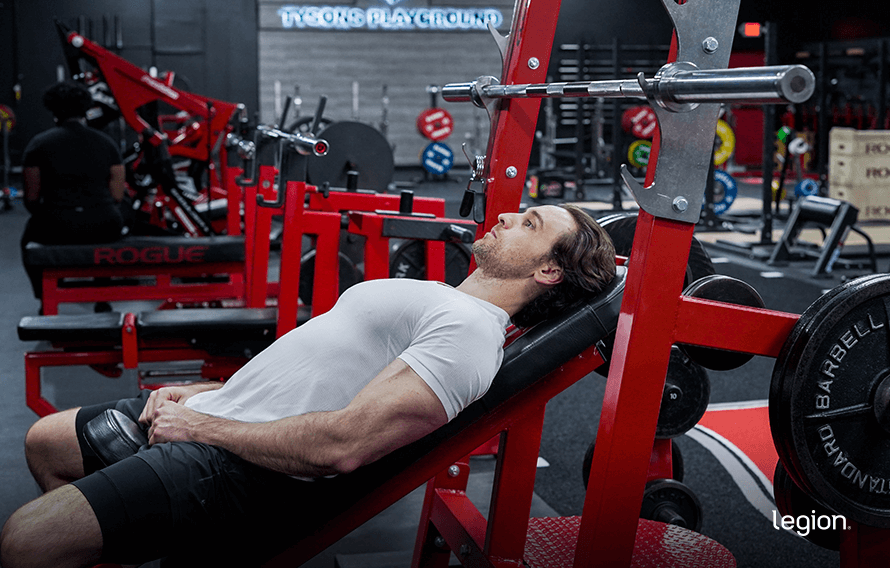
(Chances are you’ll want to regulate your physique place barely based mostly in your anatomy—extra on this in a second).
Whereas conserving your butt planted on the bench, increase your chest up towards the bar, pinch your shoulder blades collectively, and pull your shoulders down towards your waste. Your higher again and shoulders ought to really feel tight, virtually uncomfortably so. A superb cue for that is to consider pulling your shoulder blades “into your again pockets.”
Right here’s what this appears to be like like:
Some folks additionally wish to grip the bar and even the bench to assist push their shoulder blades into the appropriate place. Right here’s what this appears to be like like:
You may mess around with each approaches and see what works greatest for you.
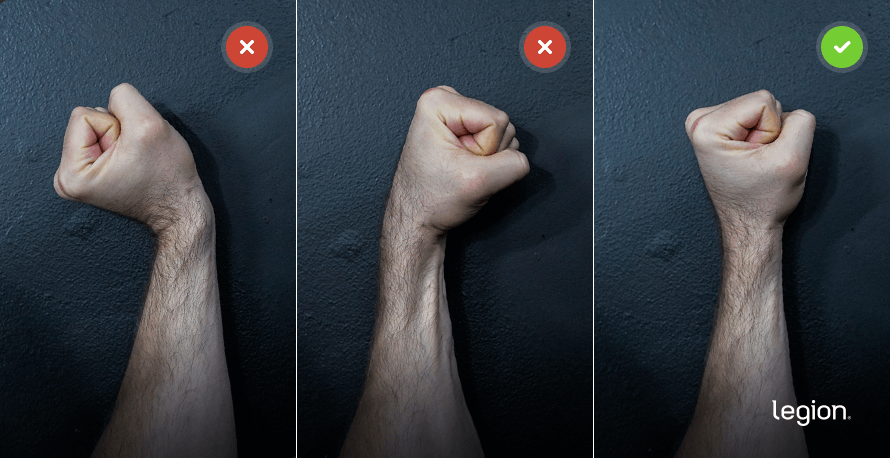
2. Grip the bar
Grip the bar along with your palms barely wider than shoulder-width aside, about 22 to 28 inches, relying in your construct, like this:
Should you go too slender, you’ll shift the emphasis to the triceps versus the pecs, and for those who go too extensive, you cut back the vary of movement and effectiveness of the train and put extra stress in your shoulders.
Maintain the bar low in your palms, nearer to your wrists than your knuckles, and squeeze it as arduous as you may. Your wrists must be bent simply sufficient to permit the bar to settle into the bottom of your palm, however not folded again at a 90-degree angle. This prevents wrist ache.
Right here’s how this appears to be like:
A great way to verify your grip width is to have a good friend get in entrance of you and verify the place of your forearms on the backside of the motion. You need your forearms to be as near perpendicular to the bottom as attainable. That’s, straight up-and-down vertical, like this:
Don’t use a “thumbless” or “suicide” grip (because it’s aptly known as) the place your thumbs lie subsequent to your index fingers versus wrapped across the bar. The rationale for that is apparent: whenever you’re going heavy, it’s surprisingly straightforward for the barbell to slide out of your palms and crash down in your chest, or worse, your throat or face; and there’s no profit to this fashion of grip.
3. Place your ft
Plant your ft flat on the bottom.
Begin along with your ft shoulder-width aside, and mess around with totally different positions till you discover one which feels most secure. Some folks choose to have their ft pulled again towards the bench, and others choose to have them straight beneath their knees.
As you push your ft aside, it’s best to really feel pressure in your glutes, groin, and hip flexors.
It’s necessary to get this proper, as a result of your legs assist stabilize your higher physique and preserve your shoulder blades glued to the bench, which lets you use heavier weights.
As you develop into extra skilled over time, you’ll be taught to push your ft into the bottom simply as you start to push the bar off of your chest, which is named “leg drive” in powerlifting circles.
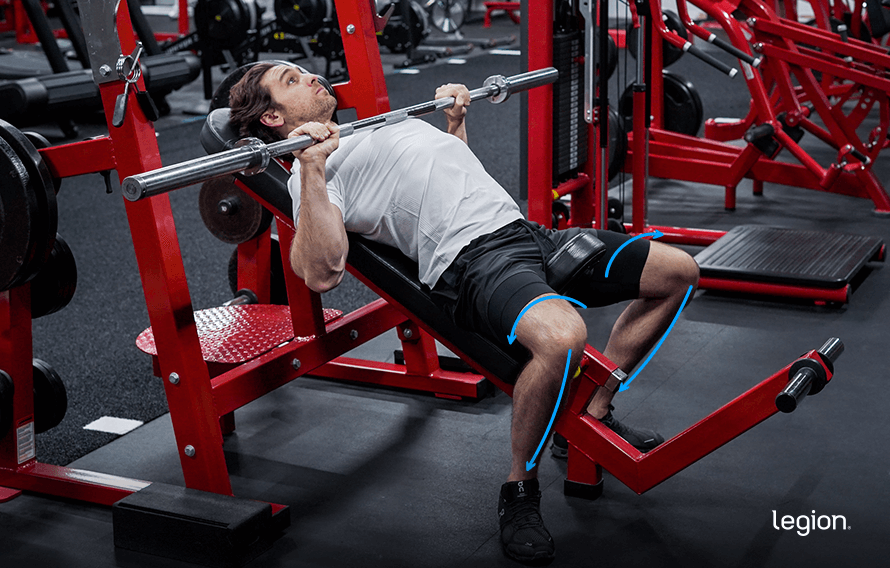
Bear in mind to maintain your legs as tight as attainable throughout each rep. A straightforward manner to do that is to push your knees out to the perimeters and push your heels into the bottom as you push the bar off your chest. A typical mistake is to let your knees shoot inward throughout your previous couple of reps, which reduces pressure in your higher physique and makes it more durable to complete your set.
4. Arch your again
You don’t need your again flat on the bench and also you don’t need it so arched that your butt is floating above it.
As an alternative, you wish to keep the pure arch that happens whenever you push your chest out, your butt into the bench, and your ft aside, like this:
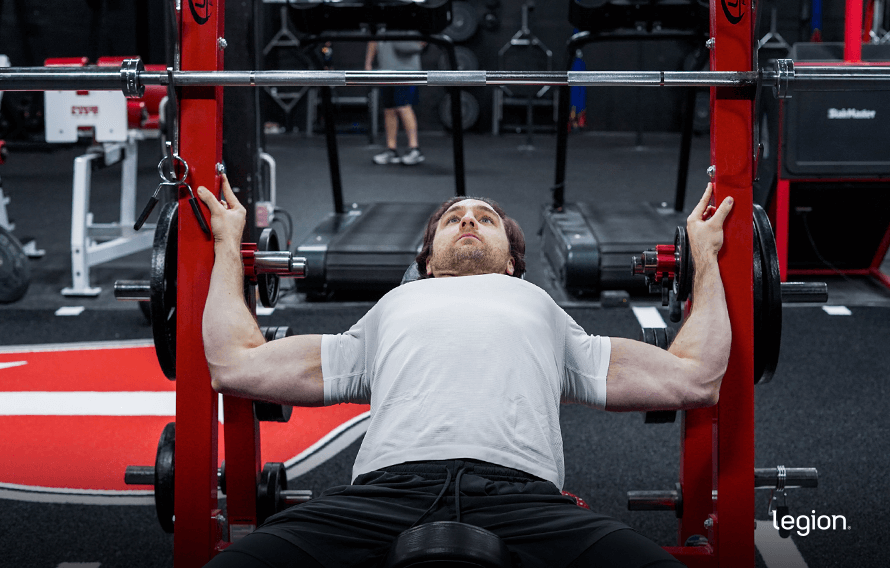
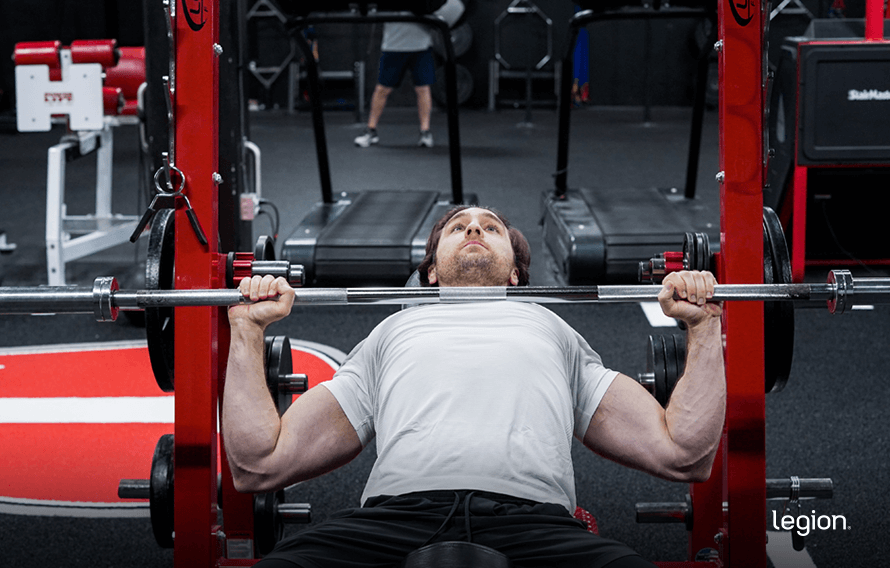
5. Unrack the bar
Unrack the bar by locking your elbows out to maneuver the bar off the hooks.
Whereas conserving your arms locked, transfer the bar horizontally till it’s straight over your shoulders. Don’t attempt to convey the load straight from the hooks to your chest, and don’t drop your chest and loosen your shoulder blades when unracking.
Listed below are just a few good pointers for dialing in your rack place:
- If you must push the bar greater than two or three inches increased than its beginning place on the hooks, then you want to place the bar increased on the rack.
- If you must pull your shoulders out of place to unrack the bar, then it’s too excessive and you want to place the bar decrease on the rack.
- If you must transfer the bar horizontally greater than 4 or 5 inches away from the rack to press it with out hitting the pins, then it’s best to alter your beginning place in order that the bar is straight over your nostril or mouth as an alternative of your eyes.
Step 2: The Descent
The very first thing it’s best to know in regards to the descent is the way to tuck your elbows correctly.
Many individuals make the error of flaring them out too far to the perimeters (away from the physique), which might trigger shoulder ache. This alone might be why variations of the bench press have a foul repute as shoulder wreckers. A much less frequent mistake is tucking your elbows too near your torso, which robs you of stability and power and may irritate your elbows.
As an alternative, you need your elbows to stay at a 50- to 75-degree angle relative to your torso all through all the motion. This protects your shoulders from harm and is a secure, robust place to press from. Right here’s a useful visible:
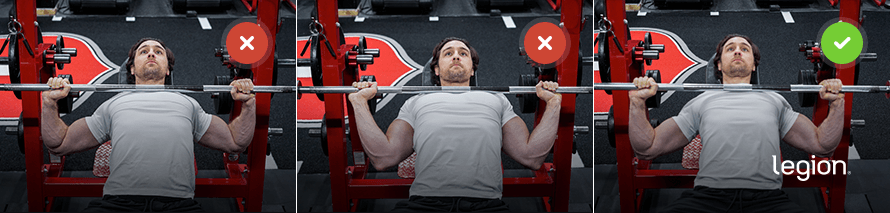
As you may see within the left picture, the higher arms are at a couple of 90-degree angle relative to the torso, which is difficult on the shoulders. Within the center picture, the higher arms are at a couple of 20-degree angle, which is difficult on the elbows and shoulders and reduces how a lot weight you may press. The fitting picture reveals the perfect place, with the higher arms about 60-degrees relative to the torso.
The precise angle you utilize will rely in your anatomy, however the level is that this: don’t flare your arms out, and don’t preserve them tucked in too near your torso.
Protecting your elbows in place, decrease the bar to the higher a part of your chest slightly below your collarbones. The bar ought to transfer down in a straight line to your chest, not towards your face or stomach button, like this:
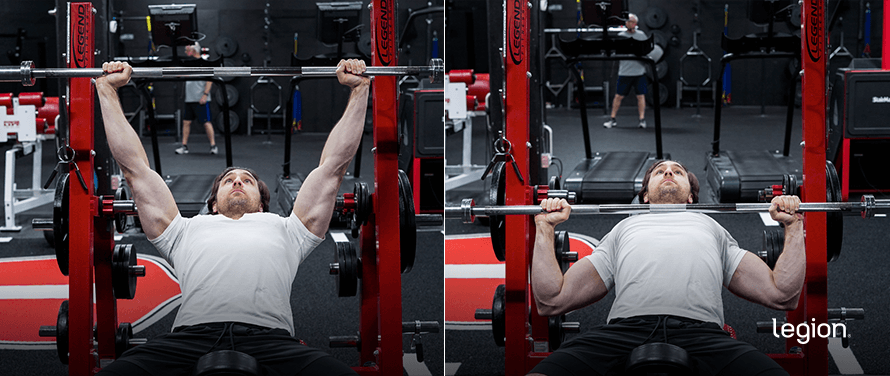
As soon as the bar has touched your chest (touched, not bounced off of), you’re able to ascend.
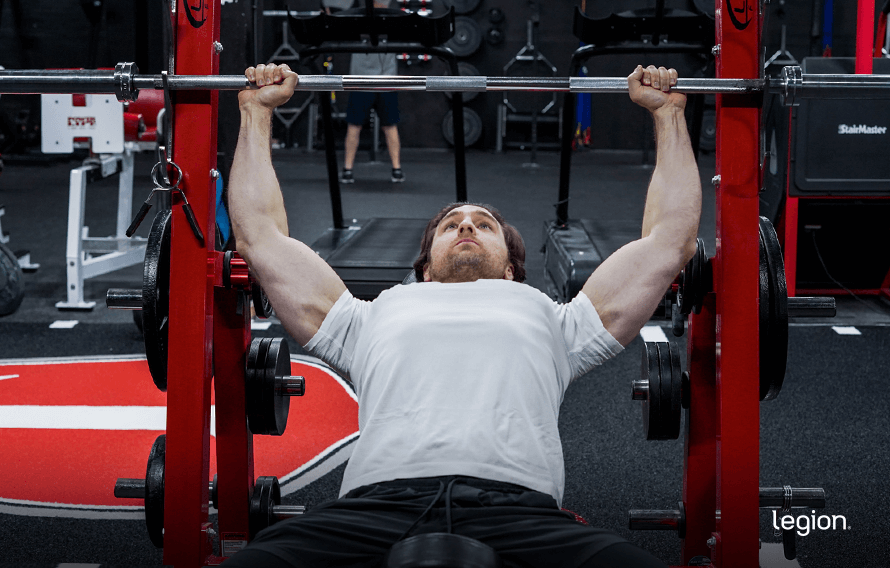
Step 3: The Ascent
Though it’s known as the incline bench press, it’s higher to consider the ascent as pushing somewhat than urgent.
That’s, image that you simply’re pushing your torso away from the bar and into the bench as an alternative of urgent the bar away out of your physique. This may enable you to keep correct type and management of the bar and preserve pressure in your higher again.
Protecting your shoulder blades down and pinched, your elbows tucked, your decrease again barely arched, your butt on the bench, and your ft on the ground, push in opposition to the bar to get it off your chest.
It’s also possible to use the “leg drive” I discussed earlier by urgent your heels into the ground. This transfers power up by the hips and again, which helps keep correct type and will increase the quantity of upward power you may generate.
The bar ought to transfer up in a straight line, passing your chin, and ending the place it started: with the bar straight over your shoulders.
Lock your elbows out on the prime of the motion. Don’t preserve them barely bent as this needlessly reduces the vary of movement.
You’re now prepared for the subsequent rep.
When you’ve accomplished the ultimate rep in your set, you’re able to rack the bar. Don’t attempt to press the bar straight into the hooks as a result of for those who miss, it’s coming down in your face, like this:
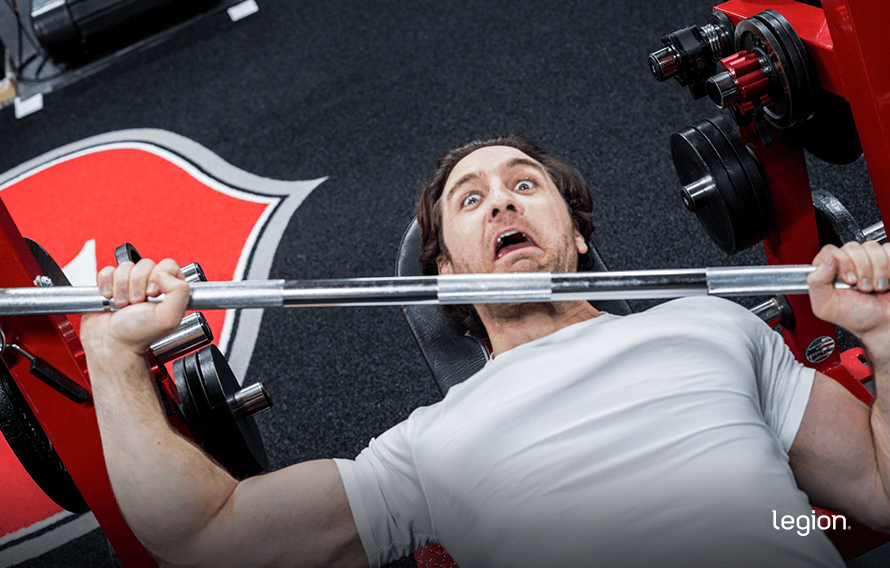
As an alternative, end your ultimate rep with the bar straight over your shoulders and your elbows locked, after which slam the bar horizontally again into the rack.
That’s it!
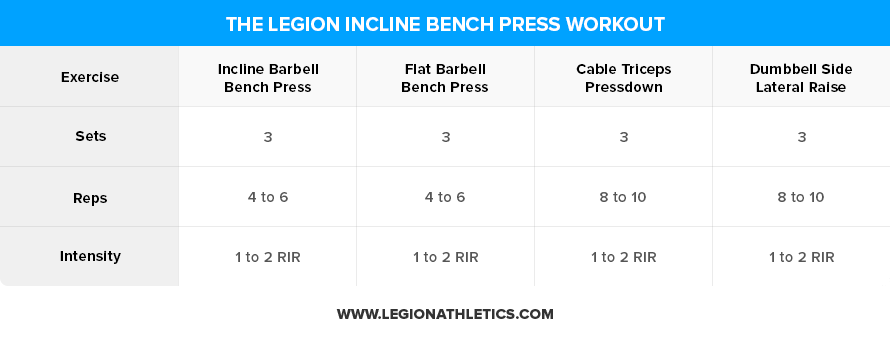
A Easy, Efficient, and Difficult Incline Bench Press Exercise
Relating to exercise programming, you may deal with the incline bench press roughly the identical because the flat bench press. I typically like to incorporate them in the identical exercise, often solely altering the order of workouts so I can periodically reap the advantages of each (extra higher chest growth with incline, extra weight with flat).
Because the incline bench press is a compound train, you often wish to do it at the start of your exercises whenever you’re feeling freshest (the primary or second train), and it usually works greatest when carried out for comparatively low reps (eight or fewer).
With that in thoughts, right here’s an efficient incline bench press exercise that features a number of different workouts in your chest, shoulders, and triceps.
And for those who’d like extra choices and steerage on the way to incorporate this exercise right into a exercise routine, enter your e-mail deal with within the type under.
And now just a few particulars on how to do that exercise correctly.
Heat up earlier than every exercise.
If you heat up for the incline bench press (or every other train), right here’s the protocol you wish to observe:
- Estimate roughly what weight you’re going to make use of in your three units of incline bench press (that is your “arduous set” weight).
- Do 10 reps with about 50% of your arduous set weight, and relaxation for a minute or two.
- Do 10 reps with the identical weight at a barely sooner tempo, and relaxation for a minute or two.
- Do Four reps with about 70% of your arduous set weight, and relaxation for a minute or two.
Then, do three units along with your arduous set weight.
After your warm-up and arduous units for the incline bench press, you don’t have to heat up for the remainder of the workouts within the exercises—your muscle tissue will probably be a lot heat already.
If you wish to be taught extra in regards to the significance of a correct warm-up and the way to heat up for various exercises, take a look at this text:
⇨ The Greatest Option to Heat Up For Your Exercises
Use Reps In Reserve (RIR) to regulate exercise depth.
Reps in Reserve (RIR) is a technique of controlling your exercise depth, and it really works like this:
1 RIR = 1 rep shy of failure
2 RIR = 2 reps shy of failure
Three RIR = Three reps shy of failure
. . . and so forth.
For all the workouts on this exercise, I like to recommend you utilize an depth of 1 to 2 RIR, which implies you wish to do as many reps as you may inside the prescribed rep vary till you’re feeling you may solely do 1 or 2 reps extra after which cease.
For instance, for those who’re doing Three units of Four to six reps of incline bench press, you wish to choose a weight that lets you end every of your units feeling like you may have pressed 1 or 2 extra reps for those who completely needed to, whereas finishing at the very least Four reps and no more than 6.
Take a look at this text if you wish to be taught extra about the way to use Reps in Reserve to enhance the effectiveness of your exercises:
⇨ This Is the Greatest Information to the RPE Scale on the Web
When you hit the highest of your rep vary for one set, add weight.
For example, for those who incline bench press 135 kilos for six reps in your first set, you then add 5 kilos to every facet of the bar in your subsequent set.
If, on the subsequent set, you will get at the very least Four reps with 145 kilos, that’s the brand new weight you’re employed with till you may press it for six reps, transfer up, and so forth.
Should you get Three or fewer reps, although, cut back the load added by 5 kilos (140 kilos) and see how the subsequent set goes. Should you nonetheless get Three reps or fewer, cut back the load to the unique 6-rep load (135 kilos) and work with that till you are able to do two 6-rep units with it, after which improve the load on the bar.
This technique is named double development, which you’ll find out about on this podcast:
⇨ Find out how to Use Double Development to Get Extra From Your Exercises
Don’t go to absolute muscle failure each set.
Muscle failure is the purpose the place you may not preserve the load transferring or keep correct type and have to finish the set.
We must always take most of our units shut (however not all the best way) to muscle failure.
Analysis reveals taking units to failure isn’t any extra helpful for muscle progress than taking units one to 2 reps shy of failure, and it could actually improve the danger of harm or burnout. That is significantly true on compound workouts just like the squat, deadlift (trap-bar or barbell), bench press, and overhead press.
Thus, for this reason I like to recommend you are taking your whole units one to 2 reps shy of failure (1 to 2 RIR), however not all the best way to failure (zero RIR).
You may be taught extra about the way to take units shut (however to not) failure on this article:
⇨ This Is the Greatest Information to the RPE Scale on the Web
Relaxation Three to Four minutes in between every set.
This provides your muscle tissue sufficient time to completely recoup their power so that you may give most effort every set.
If you wish to be taught extra about how lengthy it’s best to relaxation between units, take a look at this text:
⇨ How Lengthy Ought to You Relaxation Between Units to Achieve Muscle and Power?
The Backside Line on the Incline Bench Press
The incline bench press has been a go-to chest train for bodybuilders for many years, and for good cause. It’s among the best chest builders you are able to do, and it’s particularly efficient for creating your higher chest.
What’s extra, the incline bench press not solely trains your pectorals (chest muscle tissue), however your shoulders and triceps as nicely.
To get essentially the most out of the incline bench press, nonetheless, you want to be taught and apply correct type. Right here’s what that appears like in a nutshell:
- Lie on an adjustable bench angled at 30- to 45-degrees.
- Pinch your shoulder blades collectively, pull your shoulders down, and plant your ft firmly on the bottom.
- Seize the bar so your palms are barely wider than shoulder-width aside. The bar must be resting in your palms somewhat than in your fingers.
- Unrack the bar and maintain it over your higher chest.
- Decrease the bar down in a straight line and contact it slightly below your collarbone. Whereas reducing the bar, squeeze it arduous, preserve your butt involved with the bench, and press your ft into the ground.
- Press the load again as much as the beginning place.
- You’re now prepared for the subsequent rep (or to re-rack the bar if it’s the top of your set).
Now go get incline bench urgent!
Should you preferred this text, please share it on Fb, Twitter, or wherever you want to hang around on-line! 🙂
+ Scientific References
- Schoenfeld, B. J., Pope, Z. Okay., Benik, F. M., Hester, G. M., Sellers, J., Nooner, J. L., Schnaiter, J. A., Bond-Williams, Okay. E., Carter, A. S., Ross, C. L., Simply, B. L., Henselmans, M., & Krieger, J. W. (2016). Longer interset relaxation durations improve muscle power and hypertrophy in resistance-trained males. Journal of Power and Conditioning Analysis, 30(7), 1805–1812. https://doi.org/10.1519/JSC.0000000000001272
- Lacerda, L. T., Marra-Lopes, R. O., Diniz, R. C. R., Lima, F. V., Rodrigues, S. A., Martins-Costa, H. C., Bemben, M. G., & Chagas, M. H. (2020). Is Performing Repetitions to Failure Much less Necessary Than Quantity for Muscle Hypertrophy and Power? Journal of Power and Conditioning Analysis, 34(5), 1237–1248. https://doi.org/10.1519/JSC.0000000000003438
- Dugdale, J. H., Hunter, A. M., Di Virgilio, T. G., Macgregor, L. J., & Hamilton, D. L. (2019). Affect of the “slingshot” bench press coaching support on bench press kinematics and neuromuscular exercise in aggressive powerlifters. Journal of Power and Conditioning Analysis, 33(2), 327–336. https://doi.org/10.1519/JSC.0000000000001853
- Trebs, A. A., Brandenburg, J. P., & Pitney, W. A. (2010). An electromyography evaluation of three muscle tissue surrounding the shoulder joint through the efficiency of a chest press train at a number of angles. Journal of Power and Conditioning Analysis, 24(7), 1925–1930. https://doi.org/10.1519/JSC.0b013e3181ddfae7
- Lauver, J. D., Cayot, T. E., & Scheuermann, B. W. (2016). Affect of bench angle on higher extremity muscular activation throughout bench press train. European Journal of Sport Science, 16(3), 309–316. https://doi.org/10.1080/17461391.2015.1022605
Should you loved this text, get weekly updates. It is free.
Sending…
Nice! You are subscribed.
100% Privateness. We do not hire or share our e-mail lists.
[ad_2]
Source link


")
